SHEAR DATA SYSTEM
SUPERVISOR’S MANUAL
The shear data system allows the front office staff to enter jobs for the rollformer into a list which will appear on the operator’s computer. You should start by reading the short operator’s manual so that you will understand what the operator sees on his end.
Since the supervisor’s tasks are more complex and consist of several different operations, they are organized below by tasks. The first tasks discussed are those you will use most frequently to enter roll data and jobs.
But first you have to access the supervisor’s screens. To do this, you will click the icon named ‘Jobs / Rolls’ which has been placed on the supervisor’s computer desktop.
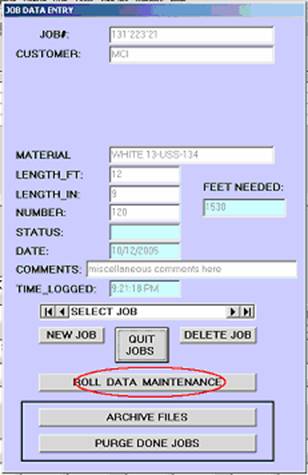
The first screen which will appear is for entering the individual jobs, but the first thing you are going to have to do is enter data on your rolls of material before you can enter any jobs.
ENTERING NEW ROLL DATA
The roll data has it’s own screen, and you get to that screen by clicking on the ‘Roll Data Maintenance’ button on the bottom of the ‘Jobs’ screen. Then the roll data screen will appear:
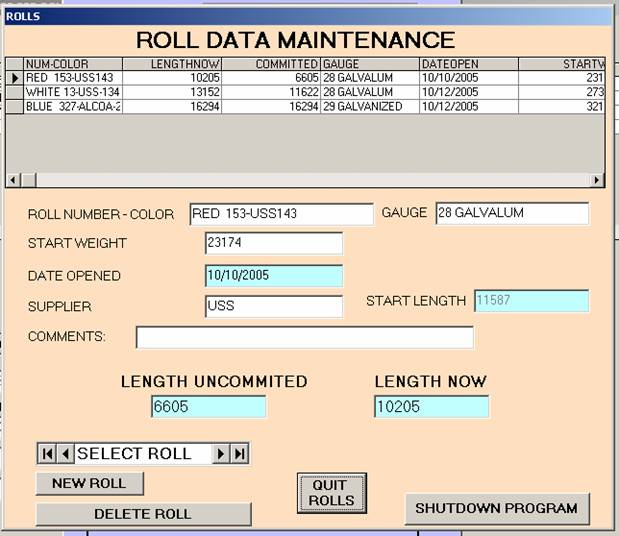
This screen shows roll data for each roll in turn in the windows at the bottom of the screen. You select a roll for viewing from the summary list at the top of the screen by using the arrows next to ‘SELECT ROLL’ just the same way the jobs are selected on the operator screen.
To start using a new roll, click the ‘NEW ROLL’ button. This will cause the screen to change so that you can enter the new roll data.
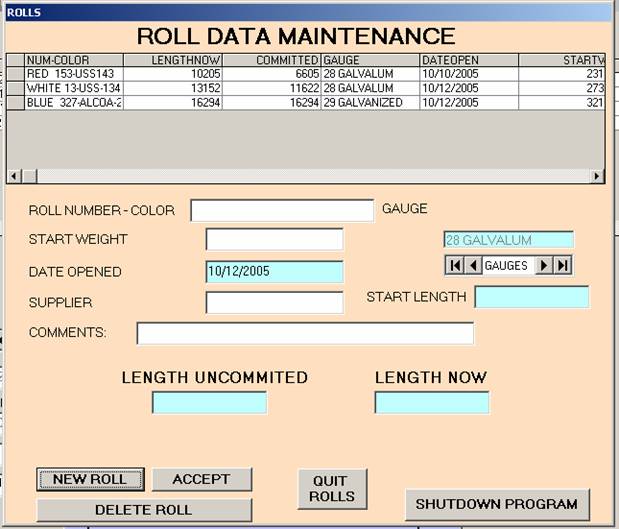
Enter the Color and Roll Number. Because this window may be cut short on the summary part of the operator’s screen, it is a good idea to start by entering the color, then leave a few spaces and enter the roll number. All this information goes into the top window labeled ‘ROLL NUMBER – COLOR’. You can enter any letters or numbers and most of the punctuation characters in this window. Then enter the starting weight of the roll in pounds in the’ Start Weight ‘ window. Enter the Supplier name in the ‘Supplier’ window, and any comments you may want to remember in the comments window. These comments will NOT be accessible to the operator. Be sure to select the gauge of material with the selector marked ‘GAUGES’ on the right side of the screen.
Note that the ‘Date Opened’ information has been automatically filled in for you, and that this window is blue. Throughout this program, blue windows will be automatically filled in by the program, so don’t enter anything in the three blue ‘LENGTH’ windows.
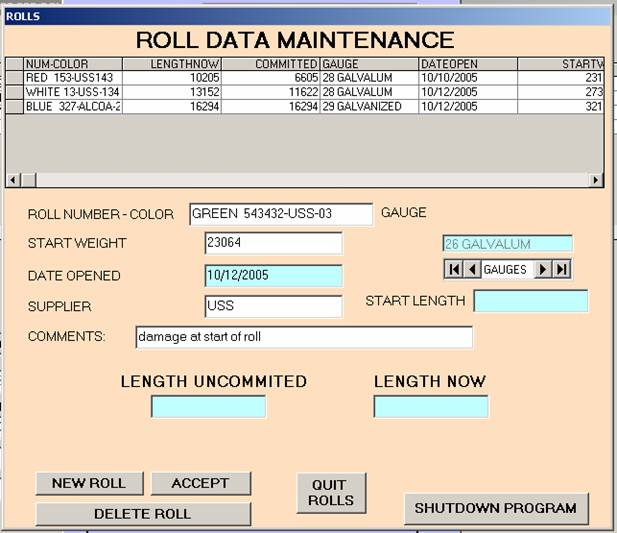
Once the four white data windows are filled to your satisfaction and the gauge has been selected, Click the ‘ACCEPT’ button to add the roll to the list.
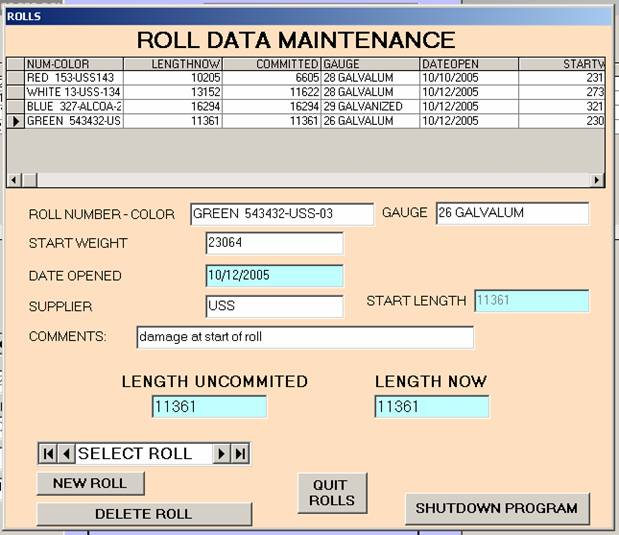
Notice that the new roll has been added to the summary list at the top and that the three LENGTH windows have been filled in with the same number. These Lengths are calculated from the roll weight you entered and the weight equivalent which you selected from the Gauges database when you chose the gauge of the material. The gauge selector has been removed and replaced by the window which displays the gauge of this roll.
When you start a new roll, the START LENGTH, LENGTH COMMITTED, and LENGTH NOW values are all the same, since no material has been used off the roll. As you enter jobs on the JOBS screen using this roll of material, the amount required for that job is deducted from the LENGTH UNCOMMITTED. This tells you how much material remains unassigned on that roll. If you remove a job from the jobs list before it is sent to the rollformer, then that job’s required material is added back to the LENGTH UNCOMMITTED. Once a job is sent to the rollformer, the length required for that entire job is deducted from LENGTH NOW, and it cannot be called back.
So at any given time you may have some jobs that you have already run off a particular roll, and some jobs which you have entered using that roll of material but which have not yet been sent to the rollformer. So you will see different numbers in the three LENGTH windows. Once all of the jobs that you have entered for this roll have been sent to the rollformer, the LENGTH UNCOMMITTED and LENGTH NOW values will once again be equal. The START LENGTH never changes after the roll data is first accepted.
MANUAL ROLL LENGTH CORRECTION
You may want to weigh the roll in the middle of it’s life and make a manual length calculation. If you find that this value is different from LENGTH NOW. You can correct LENGTH NOW or LENGTH UNCOMMITTED at any time, by selecting that roll (so its data appears in the lower windows on the roll screen). Then you just type in the new values. When you choose a new roll or close the ROLLS screen the database will be updated automatically. Nothing prevents you from fouling up the roll tracking data by entering garbage numbers in these windows, so be careful. That’s why you are the supervisor and the operator can’t change things on his screen…
DELETING A ROLL
When you are done with a roll, or if you make a mistake entering any of the data and don’t notice until after you have accepted the roll, you will want to delete the roll. Just click the DELETE ROLL button on the ROLLS screen. A window will appear asking you to confirm that you really want to delete this roll. If you are fixing a mistake, just start a new roll and type in the correct data, then ACCEPT the roll.
If you are deleting a roll that has been used up, remember that once you delete this roll all information about it is removed from the database. You may want to ARCHIVE the data files before deleting finished rolls, so that you can look at their data later for reference purposes. See the section on FILE MAINTENANCE on archiving files.
LEAVING THE ROLLS SCREEN
Click the ‘QUIT ROLLS’ button on the ROLLS screen. This will let you see the JOBS screen again.
ENTERING NEW JOBS
You access the JOBS screen as described above as the first step of accessing the supervisor screens, or if you have already been on the ROLLS screen, you will come back to the JOBS screen when you quit the ROLLS screen.
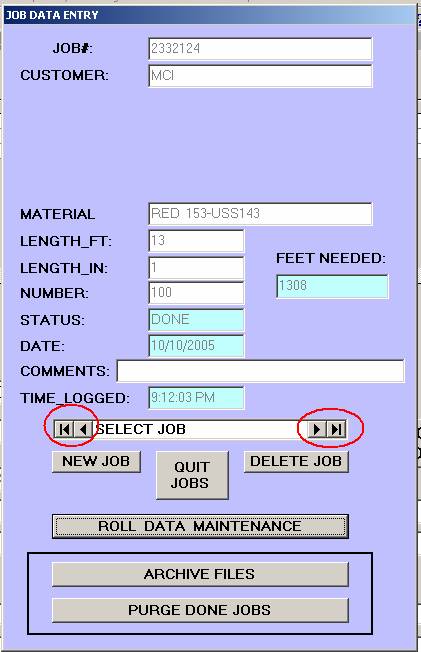
On the JOBS screen you see the same jobs that appear on the OPERATOR screen.
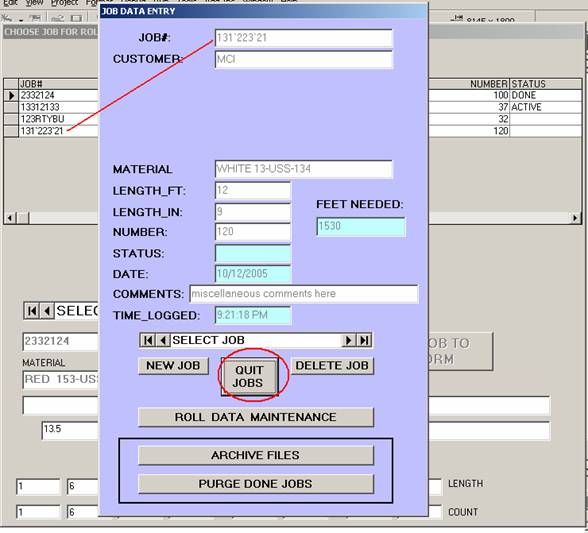
There is no summary table, you scan through the jobs by using the SELECT JOB arrows. From this screen you can add new jobs, or delete existing jobs.
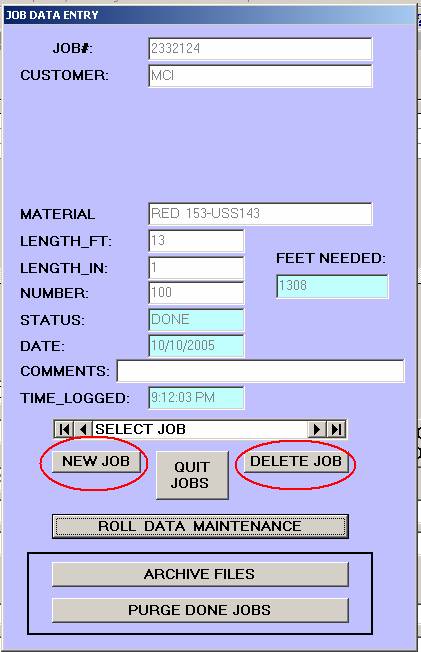
TO DELETE A JOB
Just click the DELETE JOB button. Don’t screw up because once you click the button that job is completely gone from the database. There is no warning or second chance, once you click DELETE JOB that job is gone.
ADDING NEW JOBS
Click the NEW JOB button. This will cause the screen to change and allow the new job to be entered
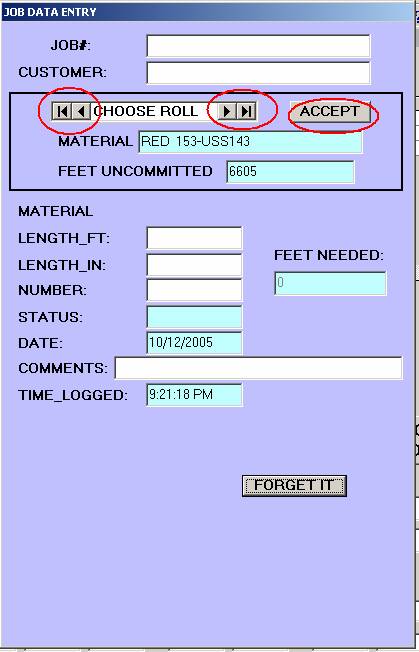
Notice that a new section of controls has appeared in the middle of the screen. This is where you will select the roll of material to use for this job. Scan through the available rolls with the CHOOSE ROLL selector arrows until you have the one you want. Then click ACCEPT. You must enter a roll into the ROLLS database by using the ROLLS screen before it can be selected for use in a job.
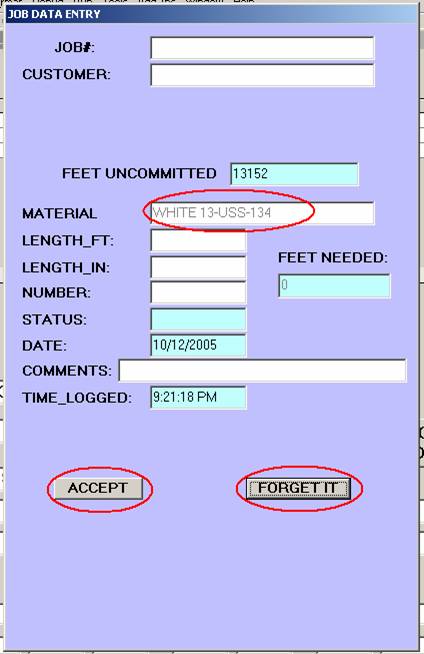
Once you choose a material roll, the roll selector stuff goes away and the roll you chose appears in the MATERIAL window. The FEET UNCOMMITED on this roll is displayed.
Then you will enter the Job Number and Customer Name in the windows at the top.
Enter the FEET part of the length in the LENGTH_FT window (whole numbers only)
And the INCHES part of the length in the LENGTH_IN window (whole number plus decimal fractions of an inch, so 3 ¼” is entered as 3.25). Enter the number of sheets to cut in the NUMBER window. As soon as you have entered the length and number, the program will compute the FEET NEEDED to do this job and display it in the blue FEET NEEDED window (remember, blue windows are normally filled by the program automatically, you do not need to type anything in these windows). You can compare this number with the FEET UNCOMMITTED to see whether you have enough material to run this job from this roll.
NOTE that you can enter the job data in any order, you don’t have to select and ACCEPT a roll before entering the job length and count. For example, say you have two roils of RED open. You can enter the job LENGTH and NUMBER and let the program calculate FEET NEEDED. Then you can scan through the available rolls (because you have not yet Accepted any roll in the top material selection window) and find the one that has enough material, or that will leave enough usable material for another job, or whatever, THEN accept that particular roll.
You do not need to enter any comments, but if you do, the comment you enter here will appear on the bottom section of the operator’s screen when he looks at this specific job. NOTE that the comments window does not appear on the operator’s summary list at the top of the screen, it will only show when he has moved the selector to that particular job, so if you want to call attention to a rush job, the best way to do that is to write a short note like ‘RUSH’, ‘HOT’, ‘URGENT’ etc. in the blue STATUS window. Normally you will not enter anything in the blue STATUS window, the machine will write in this space as jobs are sent to the rollformer. Words that you enter in the STATUS window will not affect anything, except that you MUST NOT enter the words “ACTIVE” or “DONE” in this window. Those words are reserved for the job and roll tracking process, and if you enter them, it will prevent the job from being able to be sent to the rollformer by the operator and also will cause the roll length tracking to make mistakes.
Once you have entered the job data and it is correct, click the ACCEPT JOB button at the bottom of the screen. This lower ACCEPT button will not appear until you have selected a material (roll) to use and clicked the ACCEPT button in the roll selection area at the top of the screen. Any time in the job entry process before you ACCEPT the job, you can quit new job entry by clicking the FORGET IT button.

Once you have finished entering the new job, by either ACCEPTING it or using the FORGET IT button to leave without entering the new information, you will have access to the other buttons which permit other operations, or which let you close out the supervisor’s screens. To close out supervisor screens, click the QUIT JOBS button.
Any new jobs you have entered and ACCEPTED will appear on the operator’s jobs listing.
CHANGING JOB STATUS: Once the computer has tried to send a job to the rollformer, that job will be marked ‘ACTIVE’ and it’s material will be deducted from the LENGTH NOW for that particular roll. If for some reason you need to resend that job to the rollformer, you can change the STATUS on the jobs screen just by selecting that job and then entering anything except ACTIVE or DONE directly in the STATUS window. This should only be done in case of serious problems or for troubleshooting purposes. When you change the status manually this way, two undesirable things will happen:
1) No date and time information is entered into the jobs database when you change the status manually.
2) It will be possible to resend the job to the rollformer, but material will have been already deducted from LENGTH NOW for that job. When the job is resent that same material will be deducted from LENGTH NOW. The program cannot correct this manually, so there will be an error in the roll data after that time, unless you manually correct the length on the ROLLS screen.
Nothing prevents the supervisor from changing job status manually by accident, so be careful.
FILE MAINTENANCE OPERATIONS
The file maintenance functions are accessed with buttons at the bottom of the JOBS screen.
There are two file maintenance functions:
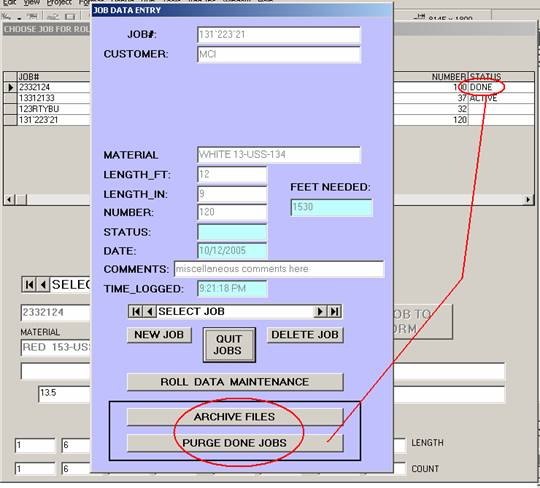
ARCHIVE FILES
Clicking the ARCHIVE FILES button causes copies to be made of the JOBS database and the ROLLS database. These copies have a name that starts with the date and includes either the word JOBS or ROLLS. Two copied files are created when you click this button, and they are saved in the folder C:\SHEAR\ARCHIVE. Use of this function is completely optional, but what it does for you, if you choose to use it, is save a copy of the two databases which will not be changed by further operations of the program. So you might want to ARCHIVE FILES at the end of the day before clearing out the previous day’s files in preparation for entering new jobs for tomorrow. Or you might want to ARCHIVE FILES before deleting a roll, so that roll’s data will be saved for later reference.
IMPORTANT NOTE: If you use ARCHIVE FILES more than once on the same date (computer date changes at midnight, providing the Windows clock on the operator station computer is set correctly), the new copy files that are created will have the same name as the earlier files created that same day. These later files will OVERWRITE the previous saved files from that same day, and the previous data for that day only WILL BE LOST. In general you will want to make sure you use the ARCHIVE FILES button only once on any given date.
After you ARCHIVE FILES, you may want to clear out all of the DONE jobs from the previous day.
DELETING DONE JOBS
When you click the PURGE DONE JOBS button, any jobs that show DONE in their Status window on the operator’s screen or the JOBS screen will be permanently erased from the JOBS database. (The job Status data is the same on both the OPERATOR and JOBS screens). You may want to ARCHIVE the database files before Purging Done Jobs, so that you will have a record of those jobs saved in the Archive files. Purging Done jobs will clear out all Done jobs in preparation for entering a new day’s work. Generally there will be one job left when this is done, the job marked ACTIVE. This will be the last job that was sent to the rollformer, and it may have already been finished. You can either leave this job in the list for the next day or delete it manually with the DELETE JOB button on the supervisor’s JOBS screen. If you leave it, the operator cannot send it to the rollformer again by mistake, because he cannot send any job marked ACTIVE or DONE to the rollformer.
All date and time information used by the program comes from the Operator station’s Windows clock. If this clock is not set correctly (date and time) then all date and time information in the databases will be bogus.
USING THE ARCHIVE FILES
The Archive files are stored ‘snapshots’ of the two databases, ROLLS and JOBS. Usually you will use Microsoft Excel to open and view these files. (Any number of other programs can read these files, but the instructions may be a bit different for accessing them.) They are saved in the folder C:\SHEAR\ARCHIVE. To view these files, start Excel, then from the top menu bar choose File/Open. A file selection window will open.

At the bottom of the file selection window, choose FILES OF TYPE “dBase files(*.dbf)”.
At the top for LOOK IN, make sure you are looking at the directory C:\SHEAR\ARCHIVE. Once you have made these two selections, a list of file names should appear, starting with the date those files were saved. Pick the file you want to look at. The information about specific jobs is in the files named (date) JOBS.dbf while the roll data is in files named (date)ROLLS.dbf Once you open these files, column headings tell you what each column of data represents. All of the information that appears on any of the screens is stored in these files, in addition to some data that is not shown on any screen. In the JOBS files three times are recorded. TIME LOGGED is the time you entered the new job into the system. TIME STARTED is the time the job was sent to the rollformer. TIME ENDED is the time the next job was sent to the roilformer. Note that the last job of the day might not have a TIME ENDED entry, because the TIME ENDED is entered only when another job is sent to the rollformer. Likewise, start and stop times might not accurately reflect how long it took to actually run a job if the rollformer sits idle during a roll change or while the operator goes to lunch.
MAKING CHANGES TO THE GAUGES DATABASE
A small database called Gauges contains the weight conversion information. To change the weight conversion numbers or to add new material types to the materials available for selection when entering new rolls, click on the GAUGE MAINT. button on the ROLLS screen:
This button opens a small window which allows you to create new material entries by clicking the ADD button, delete existing entries by clicking the DELETE button, or change existing entries by just writing the new data into the GAUGE and WEIGHT windows. Any changes you make take place immediately when you change to a new entry or exit this window with the CLOSE button.
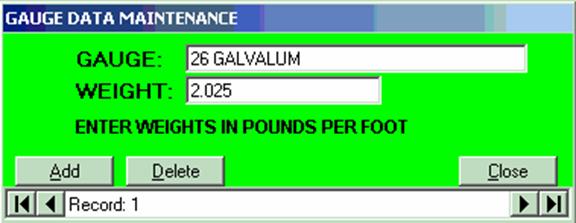
When you have finished making changes in the Gauge information be sure to close this window with the CLOSE button before using the ROLLS or JOBS screens. If this window is still open, the changes you made may not have been made available to the other parts of the program (other screens). ALSO NOTE that changes made to the weight factors in the GAUGES window are not retroactive -- that is, the new weight factors will apply as you enter new rolls after making the change, but length data for rolls you have accepted before making the weight factor change will NOT be affected.
A note on transferring files to another computer using the remote control program from the supervisor’s computer:
You can use the file transfer feature of the remote control program to copy any file from the ARCHIVE directory onto the supervisor’s computer at any time. BUT if you try to access one of the four database programs GAUGES.dbf, ROLLS.dbf, delays.dbf, or Shear1.dbf (all of these are found in C:\SHEAR) while the Shear Data program is running, you will be blocked from copying those files and most likely Shear Data will crash and have to be restarted.
You will most likely be transferring ARCHIVE files – they are located in C:\Shear\ARCHIVE.
TECHNICAL NOTES:
Terminology:
“Controller”, “Shear Controller”, “Rollformer” in this context all refer to the Eaton Durant ‘Fusion’ controller located on the shear. This is a stand alone controller which does not require any part of the Shear Data system to function. The operator can enter job data consisting of length to cut and number of sheets right on the Controller screen and run jobs without any part of the Shear Data System being connected or functional. The Shear Data System can operate with other shear or cut to length controllers which accept serial or Ethernet commands from a remote computer.
“Shear Data System” refers to the Visual Basic program and the computer it runs on (located near the shear – the “Operator’s computer”), the remote control program which permits remote control of that computer by other computers in the customer’s facility (“the Supervisor’s computer”), and those remote control computers.
“The Program” (unless it is specifically stated that we are talking about the controller’s internal user program [configuration specific to this application of controlling a shear] means the Visual Basic Shear Data program. This program manages job and roll databases which exist on the Operator’s computer, and sends jobs to the Shear Controller, essentially simulating operator keystrokes entered at the Controller itself. The remote control capability gives a person working at the Supervisor’s computer the ability to enter jobs and other data into the databases of the Shear Data System, and to retrieve information from these databases. These supervisory functions can also be executed from the Operator’s computer, if the supervisor parts of the Shear Data System program have been installed on the Operator’s computer.
The Shear Data program is written in Visual Basic
5. The executable is located in C:\Shear Data Program and is named
Project6.exe. The backup CD contains the VB project files, as well as a
backup copy of the executable, so that others can maintain or modify the
program, provided they have access to a copy of the Visual Basic programming
software.
Shear Data Operator’s Manual: http://www.falconlabs.com/shear/operator.htm
The Shear Data System and this manual are copyrighted material
Kim L. Ground
813 626 4653
Falconlabs home
page: http://www.falconlabs.com